Windows 8.1 Not Available in Store-How to Do?

This post wants to help you out when you would like to update to Windows 8.1 via Windows store but failed. It’s said that some people could not find Windows 8.1 update in Windows Store- Windows 8.1 are not available in Store.

But why do this happen? This is because you PC has not installed the “KB2871839” update and consequently you have trouble getting the Windows 8.1 update notification through App Store.

To solve the problem, press Windows logo key and C key together on the keyboard or swipe inside from the right screen edge -> Settings -> Change PC settings -> Windows Updates -> tap or click on Install. (see screenshot below)

windows update install

Once you complete the steps above, open Windows Store and try again. Generally, you will see the Windows 8.1 update notification once the APP Store is open.

If you could not download the update from Windows updates, you can download KB2871839 from Microsoft.com manually. To download KB2871839  by hand, click the link:

http://support.microsoft.com/kb/2871389

->Choose 32-bit version or 64-bit according to your current Windows. (see screenshot below)

download KB2871839 manually

 Related Posts:

How to Access Computer Registry on Windows 8

Here’s how to access computer registry on Windows 8. Read on and follow the steps below. 4 ways are available. And the first is the easiest.

How to access PC registry on Windows 8?

Method 1: Press Windows + Q -> type in “regedit” -> click or tap on the Regedit app.

Method 2: Press Windows logo key and R at the same time. -> type in “regedit“ and press Enter.

Method 3: Press Windows + X key combination->Choose Command Prompt (Admin) -> Input “regedit” and press Enter to execute. And then you will see the pop-up Registry Editor. (see screenshot below)

cmd

Method 4: Open Computer -> In the file searching box on the top right, input “regedit”. -> Double click Regedit from the results.

All the 4 ways above require administrative privileges. Otherwise, you won’t be successful. So, if you have no administrator rights, contact the administrator. But if you still failed, that might mean the registry is locked. You need to unlock it before you will be able to make and save any changes.

Here’s how to unlock the registry: Press Windows +R to pop up Run box -> type “gpedit.msc” and click OK (to open Local Group Policy Editor ) -> Under User configuration, double click Administrative templates and then System -> In the right pane, double click on Prevent access to registry editing tools -> choose Disable and then click OK. Next, continue with Method 1 in order  to try again. (see screenshot below)

lgpe    choose disable

Good luck! Hope this works for you!

Related Posts:

I Forgot my Tablet Password-How to Reset a Password on a Tablet

If you are using a Windows tablet (generally running Windows 8) and you forgot the administrator password by chance, please take it easy. Actually, you will be able to replace it with a new password with the aid of Daossoft Windows Password Rescuer.

Daossoft Windows Password Rescuer can help you reset administrator or user password of domain user or local user on all current Windows versions. It’s so powerful that you should make sure that you use this tool on your own computers only.

To reset a password on a tablet in 4 steps:

Step 1: Google Daossoft Windows Password Rescuer, find and download it. Or click this download link directly

Step 2: Install and run Windows Password Rescuer. Insert a USB flash drive to burn a password reset drive.

burn  password reset drive

Step 3: Boot your tablet from the password reset USB drive.

Press and hold Power button and Volume + button to access and change the BIOS settings. Once into the BIOS screen, select Startup and then Boot.  Your connected USB drive should be detected and displayed and you need to make it rank at the top of the list.  Press F10 to save and exit, choose yes and  then reboot.

Step 4: Select and reset the Windows user account whose password you forgot.

select and reset password you forgot

Restart your tablet and you will be able get back into your Windows 8 with the new password you reset.

Related Posts:

How to Use Homegroup on Windows 8

In this article, I am going to share something about how to use homegroup feature on Windows 8, such as how to create a homegroup in Windows 8, how to add another computer to the homegroup, etc. If you are pretty interesting, just read on!

::How it works?

Like you know, the homegroup feature allows you to share files or devices on a homegroup network. But how it works? In short, someone created a homegroup and he could invite other computers in the same LAN to join the homegroup so that he could easily share something with them. And the man he invited should show the password before becoming a member of the homegroup.

::How to create a homegroup in Windows 8?

Press Windows + W -> type in “homegroup” -> Click choose homegroup and sharing option -> Click on create a homegroup -> click Next -> choose the files or devices (like printers, scanners and so on) and click Next -> Take down the homegroup password. -> click on Finish.

create

  • Tips: This password works when you want to access files or devices located on another computer. All you have to do is to add your computer to the homegroup after typing the right password (Of course, the homegroup creator should share you with the password in advance.).

::How to join a homegroup on Windows 8?

Note: The computer where you created a homegroup and the computer that you want to add to the homegroup should locate in the same LAN. If not, they won’t be able to connect to each other.

On another computer that you want to add to the created homegroup:

1.  Click Windows logo + X keyboard shortcut (or Click the Start button on Windows 7, Vista, XP) -> click Control Panel.

2. Under network and internet, Click the Choose homegroup and sharing options link. ->Click Join now, and then follow the homegroup wizard to input the password.

  •  If you do not found any Join now button, first, check if your internet connection is available. Second, check if the homegroup that you want to join has been created.  Generally speaking, the system can automatically detect the homegroup(s) in the local area network (LAN) as long as the homegroup exists and the internet connection is available.

Related Posts:


How to Turn off Narrator on Windows 8

I am using a Windows 8 tablet (Acer W700). I am pretty annoyed by the narrator.  Every time I try to turn up the volume, the narrator comes out.  I just want to totally remove it from my computer.  Please advise. Thanks!

Have you met the same or similar situation as the brother above? If so, read on! This post shows how to turn off narrator on Windows and even remove it from the computer for ever.  You have 3 options to solve the narrator problem.

::How to turn off narrator on windows 8?

Press Windows + X hot keys and access Control Panel -> Ease of Access Center (icon view) -> Click or tap on Use the computer without a display under Explore all settings -> uncheck the checkbox that says “turn on narrator.” (see screenshot below)

use a computer   uncheck

::How to disable narrator shortcut?

In Windows 8, if you press Windows + Volume up, the narrator app will pop up by default. You can disable this keyboard shortcut by following the details below:

Press Windows + W -> type “narrator settings” (or “turn off narrator”) and press Enter on the keyboard -> Under “pressing Windows + Volume up will turn on” select Nothing or any other app except Narrator. (see screenshot below)

turn off narrator    nothing

::Can I remove narrator from my PC forever?

The answer to your question is yes. You can delete the narrator so that the narrator app won’t disturb you any longer. However, you are recommended to back it up before removing it. Maybe the copy will be of use one day.  According to my test, I found it has become harder to delete narrator file on Windows 8 than on Windows 7. To make it, you need to get full control of the narrator.exe file. Below is how:

Press Windows + X keyboard shortcut. -> choose Administrator: Command Prompt -> input and execute the commands below in turn.

takeown /f C:\Windows\System32\narrator.exe

cacls C:\Windows\System32\narrator /G jack:F

Note: “C:” is the drive where you installed your Windows 8 and “jack” is my user name. Take place of it with your own.

OK, you now will be able to delete the narrator.exe file. Just have a try by yourself. If any questions, please inform me via comments.

Related Posts:

How to Turn off Automatic Updates on Windows 8

Like you know, updates can improve your computer’s security level. And Windows highly recommends you to install updates released recently. But in some cases, it could be annoying. In my case, I really don’t like automatic update because it took the system over 5 minutes to boot to the Start screen after so-called automatic updating on my windows 8 PC. In the end, I decided to turn off automatic updates by adapting the default automatic updating mode.

::How to get to Windows update settings?

Press Windows + F or Windows + Q to open the Search charm bar. -> Type “windows update” -> click on Settings -> Open the Turn automatic updating on or off link. (see screenshot below)

search windows update

Note: Here’s another way to get to Windows updates: Press Windows + X together -> Control Panel -> Action Center (view by icon) -> Click or tap on Change settings beside Windows Update -> click or touch Let me choose on the Action Center window. (see screenshot below)

let me choose

::How to turn off automatic updates on windows 8 completely?

Under Important updates, expand the list box and select Never check for updates. Please note that your computer might be put at risk if windows updates is turn off and consequently your PC might become fragile as time goes. (see screenshot below)

choose never

::How to customize your Windows updating plan?

Similarly, under Important updates, select Download updates but let me choose whether to install them or Check for updates but let me choose whether to download and install them from the four options. Unlike the other two options, they allow you to determine which updates to download/install and when to download/install them, which makes it flexible and friendly to update your Windows. I think nobody likes a long boot time caused by automatic updating. But now you have options and don’t have to update when booting up windows 8 or when the system is busy. (see screenshot below)

choose an option

Related Posts:

How to Turn Live Tile Off/On Windows 8 8.1

In this page, I want to share something about Windows 8 live tile, such as what’s live tile, what it can do for you and how to turn live tile off/on. In my opinion, unlike the missing Start Menu on Windows 8, this novel feature seems quite good.

What’s a live tile?

A live tile is a dynamic tile telling you the newest information in time, such as the Weather tile, Finance tile, Sports tile and so forth. It’s just like a small screen displaying and refreshing the newest information about a certain topic automatically.

What does turn live tile off mean?

If you turn off live tile, you won’t get any up-to-date information just on the tile interface.  So, you are highly recommended to turn it on, which makes it far easier to get the latest information that you are interested in. In my case, I’m extremely absorbed in finance news, stock, fund, etc. Thanks to Windows 8 Live Tile, I now don’t have to search the news by myself. I just get it from the live tiles. From this perspective, it ‘s kind of like Really Simple Syndication feed. That’s why I support this new feature of Windows 8 and always keep it enabled.

How to turn live tile off/on?

Next, I will show you how to turn live tiles on/off. To be clear, not all apps have the live tile feature. Only the tiles such as Weather, Bing, Finance, Sports and News do. And they are all live by default on Windows 8.

Take Sports tile as example. If you want to turn it off, just right click on it and then choose the turn live tile off option on the shown app bar (see screenshot below).

turn live tile off app bar

If you accept this really not bad feature and want to turn it on, similarly, you can right click on the tile you want and click or tap on Turn live tile on instead.

This is really not hard at all. You can experience the live tile feature or turn on/off live tile with only few clicks.

Related Posts:

How to Find Calculator on Windows 8 Quick

Windows 8 has cancelled the Start menu. Unlike earlier versions, you won’t be able to find Calculator from the Start menu. So, how to get calculator on Windows 8? Read on! Below are the details.

Step 1: To get to the calculator in Windows 8, you should hold Windows logo key and mash Q key to bring out the APP Search charm first of all.

Step 2: In the search box, type “calculator” and click or tap the magnifier icon beside the box. (see screenshot below)

search

Step 3: Once the calculator app is found, open it. So easy it is! Actually, there is no need to search and open it every time you want to use it. You can create a shortcut for it. Just follow the detailed instructions below:

Find the Calculator app from the results and right click on it. And you’ll be able to see a toolbar (purple ribbon).You should select Pin to Start or Pin to taskbar , which will allow you to access the calculator quickly. Next time you would like to open the calculator, you just need to click the corresponding tile on the Start screen or click the icon on the taskbar of the desktop. (The shortcut to desktop is Win + D.) (see screenshot below.)

pin to

Once the calculator is open, you can see the interface shown as below:

calculator interface                   choose

The default is standard calculator, which, in general, only applies to common computing. If you want to use advanced calculators, you can click View and then choose an option from standard, scientific, programmer and statistics. (see screenshot above.)

PS:

If using a Microsoft account, you can get a calculator from Windows Store. Calculator X8, Calculator+ HD, etc are good options. All of them are free of charge.

In addition, you can also consider using an online calculator, such as http://www.online-calculator.com/(powered by Google). You can add it to your bookmarks for convenience.

That’s how to find Calculator on Windows 8! Hope this helps you out!

Related Posts:

How to Turn off Firewall on Windows 8

As you know, Windows Firewall (WF) can protect your Windows from hackers or malware’s brute-force breaking into. Windows Firewall is on by default (maybe in all Windows versions). However, you are allowed to turn off firewall on Windows 8 manually and you should do this after second thoughts. To continue with the following steps, you should sign in your Windows as administrator first.


Completely turn off Firewall on Windows 8

Method 1: Disable Firewall in Windows 8 by Charm bar

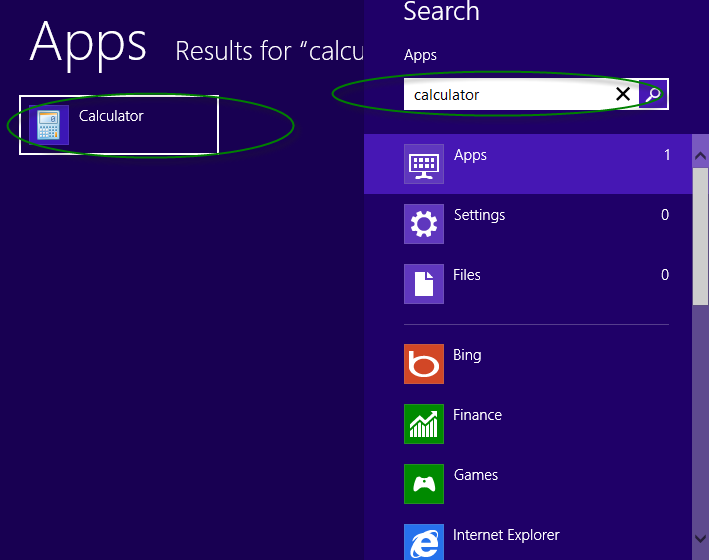
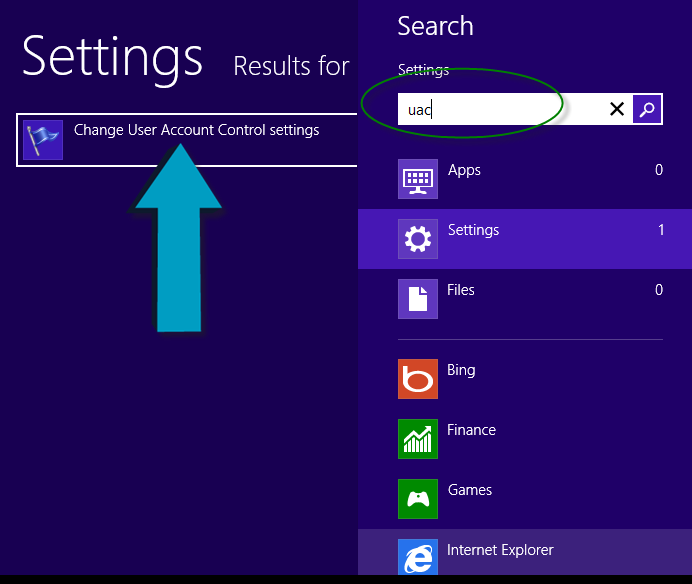
Step 1: Swipe inwards from the right edge of the touchscreen and tap Search. If your computer has no touch screen, you can also press Windows + W or Windows + F keyboard shortcut.

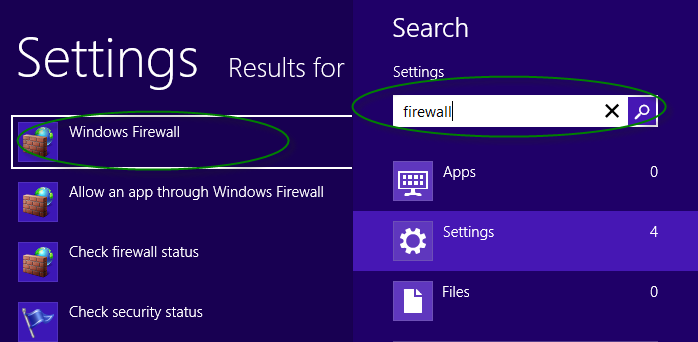
Step 2: Type “firewall”, click on Settings and select Windows Firewall from the found results.

search

Step 3: In the right-hand panel, click the Turn Windows Firewall on or off link.

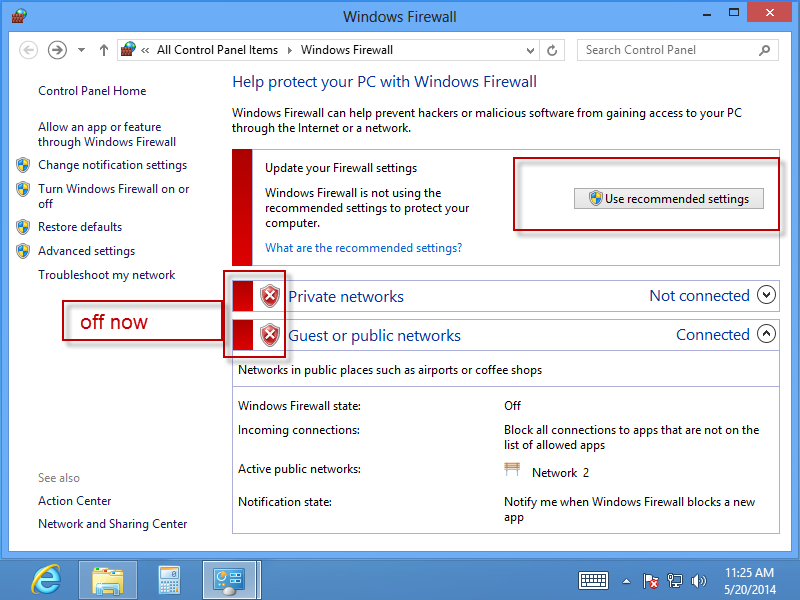
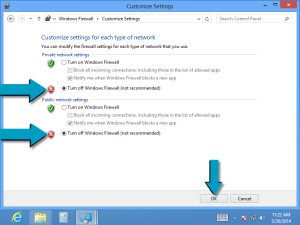
Step 4: Check the boxes that say “turn off Windows Firewall” under both private network settings and public network settings and click OK to save the settings. As you can see in the following screenshot, the Windows Firewall for Windows 8 has been turned off.

turn off  enable

  •  Tips: To turn on Windows Firewall (recommended): If you want to turn on Windows Firewall, you need to click the use recommended settings link (see screenshot above) or open Control Panel and then Action Center. Click the Turn on now beside network firewall (important).

Method 2: Turn off WF via Control Panel

Apart from the way mentioned just now, you can also turn off Windows Firewall by Control Panel. Details are below.

Step 1: Press Windows + C hot keys or swipe inwards from the right screen edge to get the Charm bar -> Settings -> Control Panel -> Windows Firewall (icon view)

Step 2: In order to disable Windows 8 firewall completely, you can click on “Turn Windows Firewall on or off” and then uncheck those two “Turn off Windows Fire.”


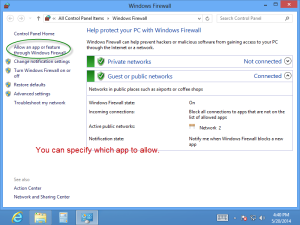
Turn off Firewall on Windows 8 partly (recommended)

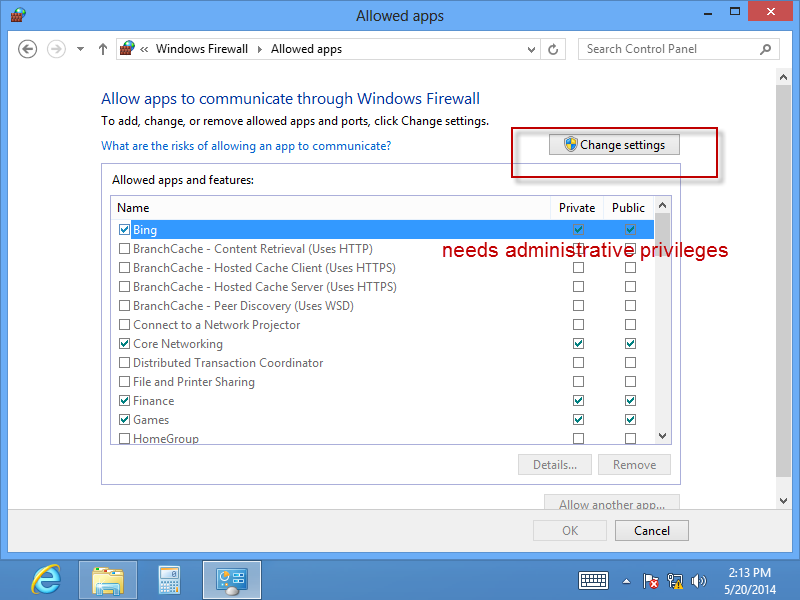
If you want to set WF to allow some programs and disallow the rest, OK, you can make it clicking the “Allow an app or feature through Windows Firewall” link and specify the allowed apps. This option makes it flexible for you to use.

Steps to make it:

Click the link: allow an app or feature through Windows Firewall -> Click change settings -> Check the program(s) that you want to allow -> Click OK.

  • Tips: If you could not see the program you want, you can click allow anther app to add an app, choose an app and then click Add button.

specify apps  change settings 

Related Posts:


How to Enable/Disable UAC on Windows 8

User account control (UAC) has been introduced into Windows since Windows Vista to prevent possibly harmful programs from making changes to your PC. This article is about how to enable/disable UAC on Windows 8.

To be clear, the UAC feature is enabled in Windows by default. However, it could be annoying especially when you use familiar and common programs usually. At this point, you can consider disabling it. But some people should keep UAC enabled because they are accustomed to running unknown programs/websites, which might put their PC at risk.

Method 1: Enable/Disable UAC via Search Charm

Step 1: To get started, press Windows logo + W on the keyboard together to display the Settings search charm.

search charm

Step 2: Input “UAC” and hit Enter -> Click the “change user account control settings” link (needs administrative privileges). Afterwards, drag the slide bar to switch to the security level that you want.

  • Choose always notify (Top one) if you always install and run new software or browse unsure websites;
  • Choose Never notify if you want to disable UAC completely. However, you should be clear about what will happen-you won’t be prompted by UAC any longer when you or programs make changes to the computer. So you’re really not recommended to do so.

never notify

Note: The key difference between the second level and the third is whether to dim the desktop or not.

Step 3: Next, click OK to apply the changes. If prompted by UAC, just click Yes to continue.

Method 2: Enable/Disable UAC by Control Panel

In addition, you can also turn off/on UAC Windows 8 by Control Panel. Just press Windows + X and choose Control Pane. -> Click on User accounts (icon view). -> Click the link: change user account control settings.

If you want to enable UAC, you can remain default (the second level) or select Always notify; if you want to disable the UAC feature fully, you can select Never notify. But you are not recommended to do this because it might do harm to your computer. Please determine which one to choose after thinking twice.

default setting

That’s all. Thanks!

Related Posts: