How to Enable Hibernate on Windows 8

In my former post, I showed you how to disable hibernate on Windows 8 (in Related Posts). To continue, this page will tell you how to enable hibernate on Windows 8. You have 3 options to choose. And the first is the easiest, I think. Besides, they also work on Windows Vista, 7 or XP though there might be something different.


Method 1: Enable Hibernate by Administrator’s Command Prompt

Step 1: Evidently, to get started, you need to log on to your Windows as administrator. Then,  press Windows logo and X keys together on the keyboard -> click on Command Prompt (Admin)

Step 2: On the command prompt black screen, type “powercfg –h on” and tap Enter. Here, “powercfg” is short for “power configuration” and “-h” stands for “hibernation.” By the way, you won’t receive any message when the command is complete.


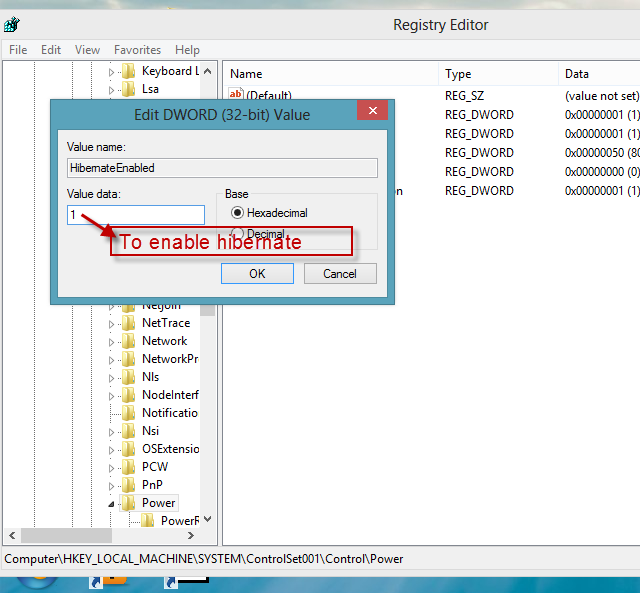
Method 2: Enable Hibernate by Registry Editor

Step 1: First off, just login to your Windows 8 with administrative privileges.

Step 2: Next, hold Window logo on the keyboard and mash R key to display Windows Run box. Type “regedit” after “Open:”

Step 3: Click the Edit menu on the top and then Find. Afterwards, enter “HibernateEnabled” after the Find what and ensure that only the Values box is checked. Click Find Next to continue.

Step 4: In the right-side pane, double click HibernateEnabled. ->Under Value data, enter “1” and press Enter. Tips: “1” stands for “yes” and “0” means “no.”

turn on hibernate

Congrats! You have made it.


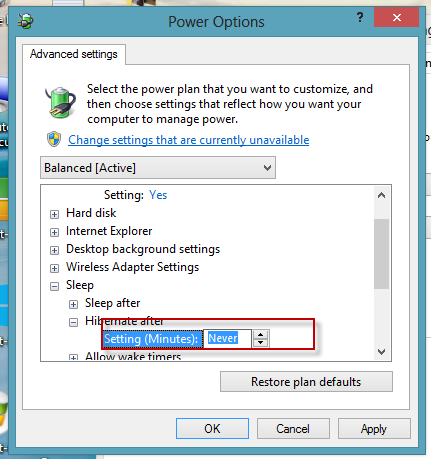
Method 3: Turn on Hibernate by Control Panel

Step 1:  Open Win+X menu by Windows + X shortcut-> click or tap Control Panel ->click System and Security -> Click Power Options ->Click the change plan settings link for your current power plan.

Step 2:  On the next screen, click the “change advanced power settings” item.

Step 3:  In the Advanced Settings tab, select the power plan that you want to configure from the list box ->double click on Sleep and then Hibernate after -> switch change setting (minutes): to the time you want by clicking the arrows on the right. -> click OK to make your changes take effect.

Tips: Couldn’t see “Hibernate after”? This means that hibernation has been disabled already. You should continue with Method 1 and then try again.

hibernate settings

Good job! You have resoundingly turned on hibernation for Windows 8.

Related Posts:

How to Use a Recovery Disk on Windows 8

A recovery disk can do you a lot of favor if made good use of-it can refresh your PC to speed it up, factory reset your computer, reset your forgotten Windows password, etc. Besides, it allows you restore your system from a restore point or system image file. This post let you know well about what it can do for you, or rather, how to use a recovery disk on Windows 8 fully.

Here’s How:

To get started, you need a recovery drive for Windows 8. If no, why not create one at once? This page shows you how to create recovery disk for Windows 8 step by step.

Step 1: Connect/insert your recovery drive to your computer.

Step 2: Access the BIOS setup utility to make your USB flash drive the default first boot device. -> Press F10 to save the changes you made. OK, you will be able to boot your computer from the recovery disk now.

Step 3: Once your recovery drive is loaded, the first screen shown as below will ask you which keyboard layout that you want to use. Click your keyboard layout to continue.

choose keyboard

Step 4: On the second screen, you are invited to choose an option. If you want to turn off the PC, click the Power button icon; if you would like to diagnose/improve your computer in trouble, just click or tap the Troubleshoot option. (see screenshot below)

choose option

Refresh PC to accelerate its running

Once you enter Troubleshoot, you have 3 options to use. The Refresh your PC utility allows you to make your PC run smoother and better without risk of losing your data, such as important documents at work or private photos.

troubleshoot


Reset PC to factory settings before you donate it

As for the Reset your PC option, you need to be careful before you perform this action because it will delete all your files. This is really a good option before you donate or sell your computer.

reset pc

Recover your computer from a restore point

To do the trick, click the Advanced Options -> click System Restore -> Click Next after reading what will happen ->follow the on-screen prompts.


Recover your PC from a system image file that you backed up before

Just click or tap on Advanced Options and then System Image Recovery -> click Next -> follow the prompts on the screen.


Automatic repair if Windows can’t boot normally

Get a failed boot problem?  Click Automatic Repair after clicking Advanced Options.


Reset Windows Password using Command Prompt

Click Advanced Options and Open Command Prompt. With Command Prompt, we can exchange the utilman.exe (an in-built utility that belongs to Ease of Access Center) and cmd.exe without logging in. The details are below: <!! Type them in turn.>

 c: <Enter>

cd windows\system32 <Enter>

ren utilman.exe utilman2.exe <Enter>

copy cmd.exe utilman.exe <Enter>

Note: “c:” stands for the drive where  you installed Windows 8.

Next time you enter the Windows 8 again, remember to recover the changes you made. That is to delete the fake utilman.exe file and rename utilman2.exe to utilman.exe.

  •  Not clear? This post tells you how to make it step by step.

Do you understand how to use recovery disc now? Why not have a try by yourself?

Related Articles:

How to Perform Password Reset on Ubuntu or Windows PCs

No matter what computer you are using, either an Ubuntu one or a Windows one, you will be able to perform password reset as long as you closely follow the step-by-step guide below:


Situation 1 of 2: Ubuntu

Yes, you heard me right-you can reset your Ubuntu user password in about 1 minute as long as you follow the step-by-step guide below.

Here’s How:

1. Power on or restart your PC.

2. Boot into recovery mode by holding the Shift key.

3. Select the option that says “Unbutu, with Linux 3.8.0-29-generic-pae (recovery mode).” And press Enter key.

select recovery mode

4. Few minutes later, you can see the Recovery Menu, shown as below. And you should use the arrow keys to highlight the root item and then hit Enter.

Important: As you can see in the top field of the following picture, it says “filesystem state: read-only”, which means that you are not allowed to make and apply changes currently.

enter  root

5. But you can change the situation by entering the following command and then hitting Enter.

mount –o rw,remount /

Note: 1) “-o” is not “zero (0)”

2) There is no space between “rw” and “remount”

remount command

6. Next, let’s start to perform a password reset for the user that you forgot the password for.

If you forgot the user name as well, just execute the command below:

ls /home

Note: 1) “l” is a lowercase “L”

2) “/” stands for the root directory

7. Well, it’s time to face the forgotten password directly. Just type in the following command after the “Enter new UNIX password:” and press Enter.

passwd <username>

In my case, I should type in “passwd jack” and hit Enter. (See the screenshot below.)

Please Note: The typed password is NOT visible. You should be serious. If you enter a wrong one, you will get a message telling you “Sorry, passwords do not match.”

8. Next, re-enter the password and hit Enter again.

passwd command

9. Great, you have made it. Now, quit the command window by inputting “exit” and pressing Enter.

Get back to the Recovery Menu, and follow the resume option to boot your computer normally.


Situation 2 of 2: Windows Family

If you are facing a forgotten password in Windows family system, you could have a third-party software utility to solve the issue because you can spare more time to enjoy your life with its help.

As for third-party software for Windows password reset, as far as I am concerned, Windows Password Rescuer might be a good option for it works pretty well and is easy-to-use enough, even for a newbie. Don’t believe me? Have a free trial by clicking the following link and prove that I am lying.

Related Posts:

How to Create a Recovery Disk for Windows 8

This video shows you how to create a recovery disk for windows 8. To be clear, some new changes has happened to Windows 8 create recovery disk. Unlike previous versions, Windows 8 allows you to create a recovery disk using USB media. So, it seems that it becomes easier to make it than before.

Steps to create a recovery disk for windows 8:

Step 1: Open Settings search charm by pressing Windows + W hot keys.

Step 2: In the search box, type “create recovery drive” and hit Enter key

search create recovery disk

Step 3: From the result(s), select and open the “create a recovery drive” link.

Note: This action needs administrator privileges.  Remember to click OK on the UAC window.

Step 4: Click Next on the Recovery dialog box.

next

Step 5: Connect your USB flash drive and make sure it’s selected. -> click Next.

select usb drive

Note: In order to improve the performance of your Windows 8 recovery media, you are really recommended not to use Memory card and flash memory card reader.

Step 5: Back up your important data before you click the Create button on the bottom.

create

(The utility is creating the recovery disk for you. Please wait…)

 Step 6: Once your recovery disk is created, click Finish to finish.

Related Posts:

How to Protect a PDF File Effectively But for Free

info theft issueAs you can see in the search results to the right, it seems that there is no doubt that personal info theft has become a global issue. So I’m always ready to share something about how to protect your PDF from undelegated accesses or changes for free. Actions speak louder than words. Just follow the step-by-step guide below. Good luck to you.

Here are the detailed instructions:

1. Open the PDF document you wish to protect, and then open the Tools pane after clicking it. (see screenshot below.)

tools-pane2. Among the options listed, choose Protection and then Encrypt with Password. (A warning dialog box appears asking you whether to be sure of changing the security.)

3. Sure, click Yes button to proceed.

4. Two sorts of password are available, and you can select either or both of them.

However, before you create a password for the PDF document, you should specify the document component(s) you want to secure. For instance, if you hope to safeguard the whole document, you may select “(dot) Encrypt all document contents.” It allows you to make a choice as needed.

If choosing an open password, you should check “require a password to open the document” and then create a password used to verify the identity before the file is opened.

If you select a restriction password, you should check “restrict editing and printing of the document”, and then create a password similarly.

Note: A password used to open files or apply changes should be strong enough-you should not use any real word that you can look up in a dictionary, any name of you, your family member, or you pet and so on.

create password pdf

5. Confirm the password.

6. Save the document to apply the new security policy by clicking File on the top left and then Save.

Now you have made it and you must type in the open password before you are able to access the document or enter the restriction password before you can save changes to it.

That’s it. May this help you out!

Related Posts: