Want to enhance the security of your Office Word documents? Read on and you might find this article helpful for it teaches you how to set up 3 defensive lines for an Office Word document, including an "open" password, a "modify" password and document protection.
As the name suggests, an "open" password is a password required to open a file or a folder. If you create a password for your Word document, nobody can open it without the password unless he cracks it.
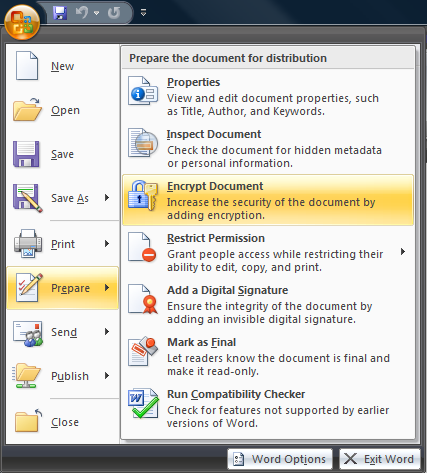
Here’s How:
1. Open the Office Word file you’d like to protect.
2. Click Office button on the top left corner.
3. Click "Prepare" item and then "Encrypt Document".
4. On the pop-up "Encrypt Document" dialog, you are allowed to create a password for the Word document. Please keep in mind that it is so dangerous to use a real word you can look up in a dictionary as your password or use your name, names of your family members, your pet’s name and so forth because it’s quite easy for hackers to guess and crack them.
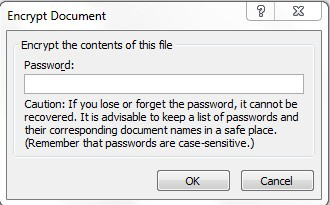
5. Confirm your password and click OK to finish the password setup.
What is a "modify" password? Similarly, it's a password required to be able to change the document and save the changes. You can follow the steps below to create a password to modify and a password to open as well.
Here are the steps:
1. Click Office button and then Save As item. (The "Save As" dialog box comes out.)
2. On the bottom right, click Tools drop-down menu and select "General Options." (See the screenshot below.)
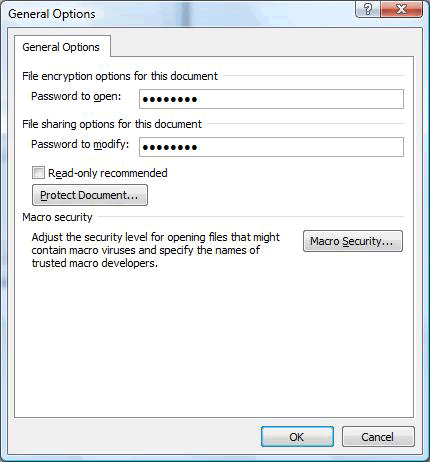
3. As you can see from the picture above, you should finish the "Password to open" box and "Password to modify" in the same manner as Way 1.
4. Click "OK". (The "General Options" dialog disappears, and you would led to the previous "Save as" dialog box.)
5. Click Save to save it to the original location. If prompted, you can just click Yes to apply the settings
Another way to protect the documents you share is to use the Protect Document pane. If enabling "Protect Document" policy, you can designate specific people who can change your document, and you can control restrictions for certain sections. It sounds like a customized and flexible protection.
Here’s How:
1. Open the Word document you want to secure and click Review menu.
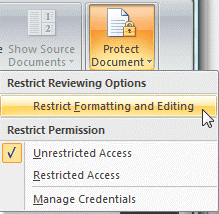
2. In the top right field, choose "Protect Document."
3. Select "Restrict Formatting and Editing"
4. Follow the prompts and customize the restrictions as needed.
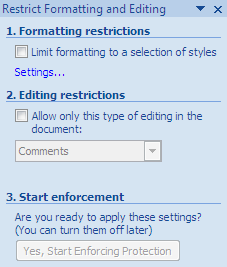
5. Click Yes, Start Enforcing Protection button.
6. Select (dot) Password and enter the password twice.

Now the Word file has been protected from unauthorized editing.

