As we all know, Windows XP is the most classical operating system and occupies a quite large number of users for a time. Undoubtedly with the popular use of it, the possibility of mistaken operations increases as well. Deleting some important files accidentally seems quite small mistakes but sometimes crucial. It is wise if you have got a backup in advance. Then how about deleting important files without a backup and you cannot restore them directly from your recycle bin? When this happens on you, take it easy! Because this article will tell you exactly how to recover deleted files in windows XP with professional Data Restore software.
To recover your deleted files, first of all, you should choose appropriate and reliable Data Restore software. Daossoft Data Restore software is prepared to help the majority of users to resolve troubles caused by data loss. It is submitted to recover deleted/formatted/corrupted files from hard drive, memory card, USB flash drive, and other removable storage devices in windows XP. Of course it supports other windows operating systems as well except windows XP. It is easy to operate and quick to recover!
Step 1: Download Daossoft Data Restore software and install it on your Windows XP computer. Tips: this software requires administrator privilege to install and run on Windows computer.
Step 2: If the files you want to recover are in external storage device, then connect it to the computer before starting the data recovery software.
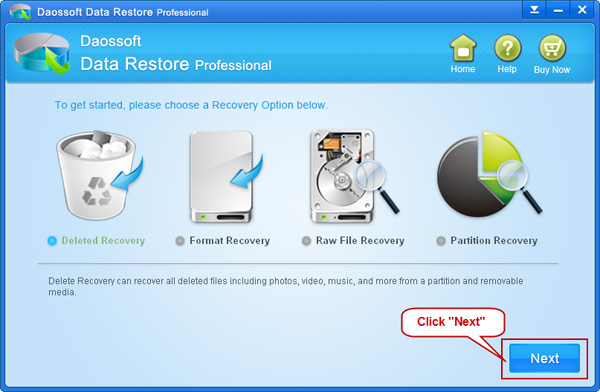
Step 3: Start the Daossoft Data Restore software and choose the “Deleted Recovery” option and then click “Next” to go on. Tips: Please try “Raw File Recovery” mode again if your lost files cannot be found by the “Deleted Recovery” mode.
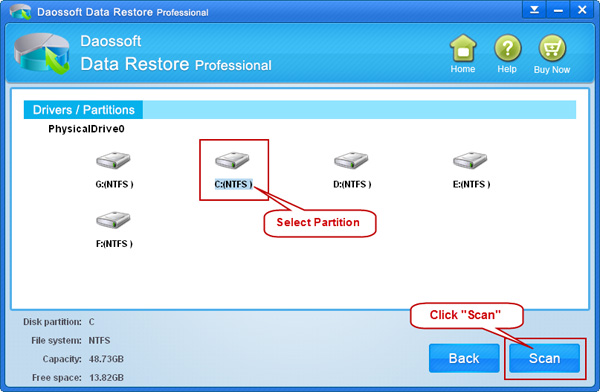
Step 4: Next select the partition or drive letter your deleted files are on, and then click “Scan” button to scan.
Step 5: Lastly, after the comprehensive scan, preview and select the files you plan to recover. Then click “Recover” button to recover and then save all the recovered files to another new partition or drive instead of the original one in case of being overwritten.
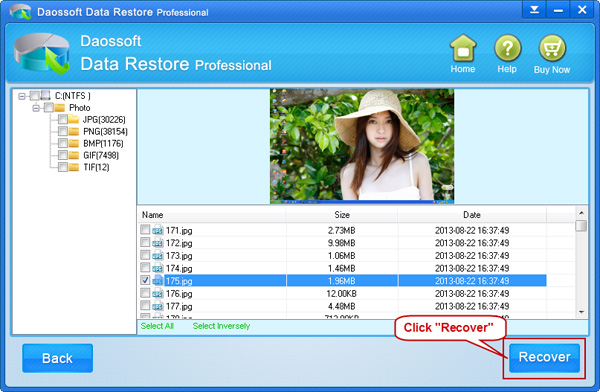
Tips: files not in picture format cannot be previewed, you can pick out you wanted files by file size, file date or file name suffix.

