I have no idea as a computer user whether you know about Virtual Machine, Virtual System, how to create virtual machines with a virtual machine software and how to install a virtual system in a virtual machine. I suppose you may not know much about them unless you are a computer professional or you have been engaging in the work related computer. For example, many programmers usually test their program codes in virtual system. To understand the virtual machine better, firstly let's figure out three questions below.
Before knowing about the virtual machine firstly you should know something about the virtual machine software. A virtual machine software is able to build an environment between computer platform and ending users in which ending users can operate software. With virtual machine you can simulate one or more virtual computers in your physic computer. Generally, there are two well-known and most widely-used virtual machine software. Microsoft Virtual PC and VMware Workstation.
A virtual machine is simulated by the virtual machine software. One or more virtual machines which can work as a real physical computer can be simulated. In which you can run a system and applications. Virtual machine need to simulate the hardware command so that it may run a little slower.
Virtual system can simulate the same environment as which the current operation system has.
Now let’s have a look at how to create a virtual machine in VMware Workstation.
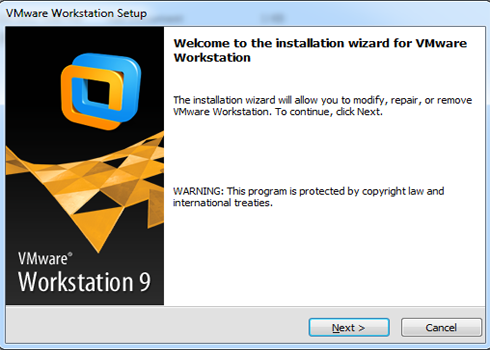
Download the VMware Workstation installation package on the net and unpack it. Double-click the ".exe" file to open the installation wizard. Click on "Next"and follow the wizard to finish installing the VMware Workstation.
Step 1: After you have installed the VMware Workstation, you can find the shortcut icon on your desktop. Run the software to come to the first window of VMware Workstation. Click on "Create a New Virtual Machine" to pop up the "New Virtual Machine Wizard".
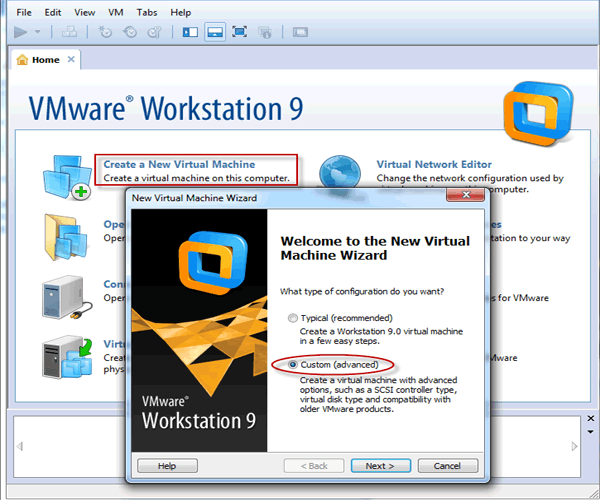
Step 2: If your computer memory is big enough you can select "Typical". You are recommended to select "Custom" to make it convenient for you to configure your virtual machine memory. Also you can complete configuration after the virtual machine is created. Here we select "Custom" and then click on "Next".
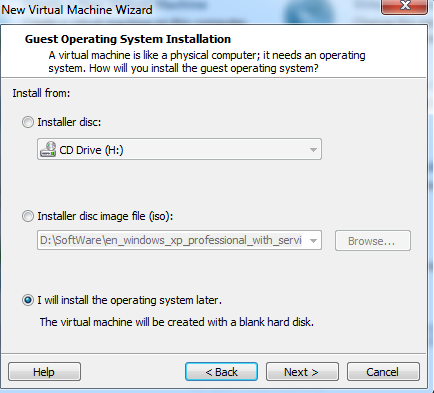
Step 3: Click on "Next" and come to the next dialog box on which you select a way to install your guest operating system. Select "Installer disc image file(iso)" if you have prepared an iso image file. Select "Installer disc" if you have a system installation CD drive. You also can select the third one "I will install the operating system later" but you need to select a installation way when you configure your virtual machine. Here we select the third item "I will install the operation system" later. Then click on "Next".
Step 4: Select a guest operating system you will install in your virtual machine. Here we select "Windows 7".Then click on "Next".

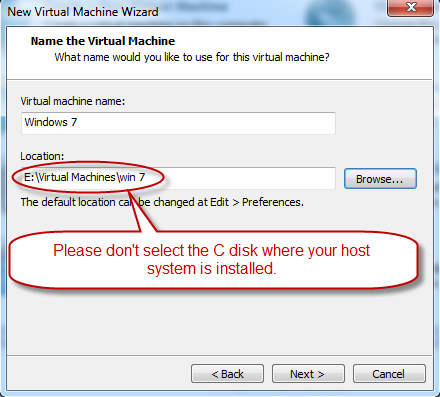
Step 5:Write a name for your virtual machine and save it in a folder path. You are recommended not to locate it in C disk in which your current host system is installed. Then click on "Next".
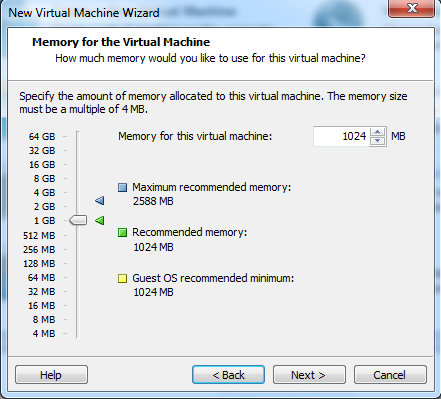
Step 6: Continue to click on "Next" until you come to the "Memory for the Virtual Machine" dialog box and you can change the memory for this virtual machine. Usually "1024M" is enough.Then click on "Next".
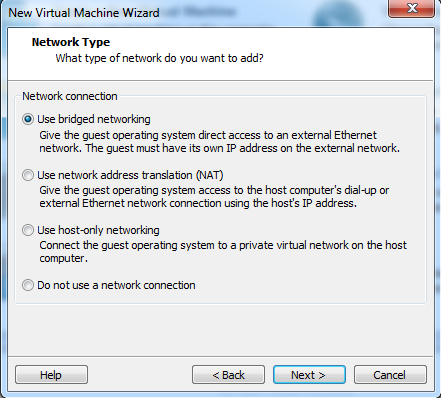
Step 7: Network Type: In this step you will decide what type of network you will add. You are recommended to select "Use bridged networking" for it is the easies way to connect. Then click on "Next".
Step 8: Continue to click on "Next" to come to the "Select a Disk" window. Select "Create a new virtual disk" if the capacity of your hard disk is big enough. You are strongly recommended not to select "Use a physical disk" because it will have an effect on your current physical disk when you operate the virtual machine. Select "Create a new virtual disk" then click on "Next".
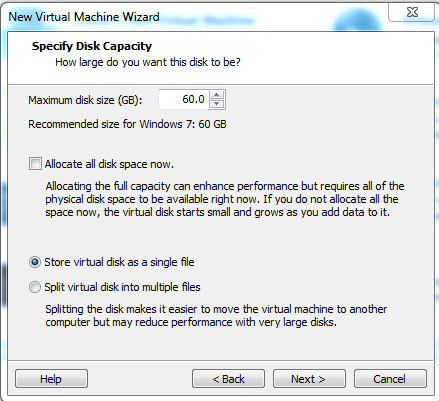
Step 9: Continue to click on "Next". In this step you can change the virtual disk capacity by the up and down arrow. And select "Store virtual disk as a single file" to store the virtual disk which is the file whose file extension is ".vmdk" as a single file.
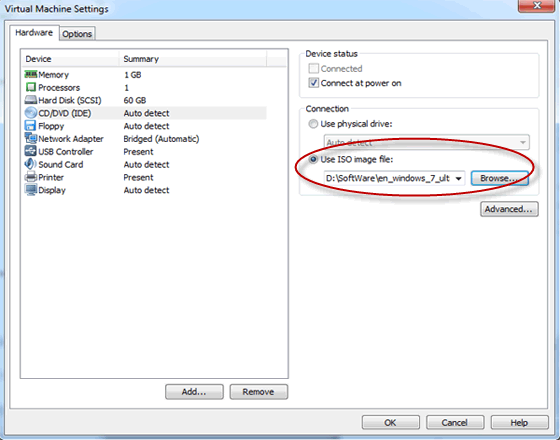
Step 10: Create a virtual disk with an extension .vmdk and save it in a path. The default path is the folder path where this virtual machine stores. Then click on "Next". Finally, click on "Finish" to finish creating a virtual machine successfully. And on the left side of the first window of VMware Workstation you can change the configuration of this virtual machine such as its memory and indicate you will use an iso image file or a physical drive to boot this virtual machine.
After the several steps above you have created a virtual machine with VMware station in which you can install a system such as Windows XP, Windows 7/8/8.1, Windows 2000, Windows Server 2003, Windows Server 2008, UNIX, LINUX, DOS and so on even you can install a Mac OS so that your one computer can run several systems at the same time as long as your computer configuration is good enough because a virtual machine in the VMware Workstation and running a system in it need big memory footprint.

