Abstact: This page tells you what’s the ReadyBoost feature and how to speed up your PC with ReadyBoost in Windows 7, especially when your PC has a quite small RAM memory and you don't want to buy another RAM (memory)-Actually, you don't have to. Hope it helps.
The ReadyBoost utility has been introduced into Windows since Windows Vista to speed up a slow computer caused by small RAM. ReadyBoost allows any compatible mass storage device to be used as a temporary hard-drive memory cache in order to increase access speed to the hard disk drive. BTY, compatible ReadyBoost devices contain USB flash drives, memory cards, flash memory, and solid-state drives (SSD).
Note: 1) USB 2.0 & USB 3.0 devices are both supported. And, you are highly recommended to use a USB 3.0 drives, which can speed your computer more observably.
2) Supports Windows Vista, Windows 7, Windows 8, etc.
Step 1: To get started, you should obtain a mass storage device first. Then, insert or connect the USB stick to your Windows 7 laptop or desktop computer. Open the “Computer” icon, find your USB flash drive under “removable storage devices” and right click on it.
Step 2: In the right-click menu, choose the last item: Properties.
Step 3: Highlight the ReadyBoost tab and choose the “Use this device.”
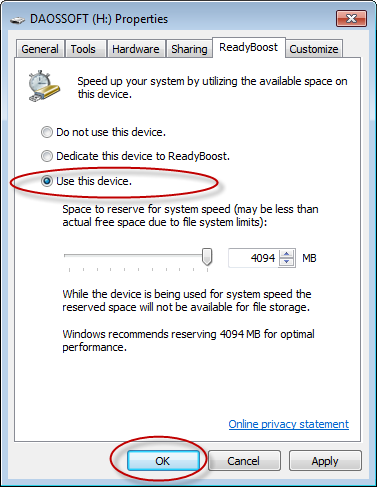
Step 4: Drag the slider to change the disk space to reserve, or enter the disk space that you want to reserve for system speed in the “MB” box. You’re advised to reserve about 4 GB for optimal performance. Eventually, click OK to make it take effect. Open and check your mass storage device. You might see the ReadyBoost.sfcache cache file with a size of 3.99GB.
Click the Start Windows logo button >>Check Computer>>Right click your USB drive>> select the Properties >> Click on the ReadyBoost tab >>choose the do not use this device>> Click OK to save the change. All right! You have made it.

