If your Dell computer laptop comes with Windows 8 as the in-built OS, it might as well have the "Secure Boot" function enabled by default. And with "Secure Boot" enabled, you won’t be able to boot your computer from CD-ROM drive or USB memory stick, Network Interface Card, etc. So, how to disable secure boot in Bios on Dell? Please refer to the detailed instructions below.
What is Secure Boot?
As you might know, so called Secure Boot is a component of Windows 8 OS that relies on the UEFI specification’s Secure Boot function to help prevent malware and "undelegated" OSs from loading during the system start-up process.
Why is it controversial?
Although Secure Boot can improve the system security, people have some concern that Microsoft’s Secure Boot function will make it difficult to install Linux or other systems on a Windows 8 laptop or desktop.
You can disable it if you don’t like it.
To disable Secure Boot, you should follow the steps below:
Step 1: Tap F2 or F12 key on the Dell logo or hold down F2 or F12 just after you start up your Dell laptop (At this point the screen is still black.) Soon you will see the BIOS screen.
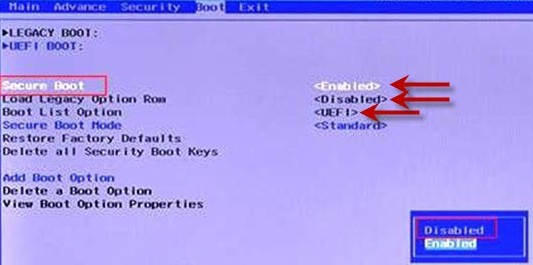
Step 2: Next, highlight the Boot tab with arrow keys, change the Secure Boot item to "Disabled".
Step 3: Afterwards, ensure that the Load Legacy Option Rom is "Enabled" and the Boot List Option is "Legacy"
Step 4: Switch to Exit tab, highlight Exit Saving Changes, and highlight Yes to save the BIOS settings.
Note: You can also press F10, select Yes, press Enter to save the settings.
Then your Dell will restart. At this time, you have disabled the Secure Boot function on your Dell successfully. And you will be able to boot your Dell from CD-ROM, DVD-ROM, USB flash drive, etc.

Daossoft Software

