How to Make a Password Reset USB for Another Windows 8 Computer

This article, a step-by-step guide, covers how to make a password reset USB for another Windows 8 computer. As we know well, a password reset USB seems to only work on a specified computer-the computer which you created it on.

Someone might ask “Can I make a password reset disk for another computer?” The answer is “yes.” And it is so easy that everyone can create one by themselves, even if you are a dummy.

::How to make a flash drive a password reset disk?

To make a password reset USB for anther Windows 8 computer, please follow the steps:

-> Google or Bing (or any other search engine) Daossoft Windows Password Rescuer, download one for free and have a try.

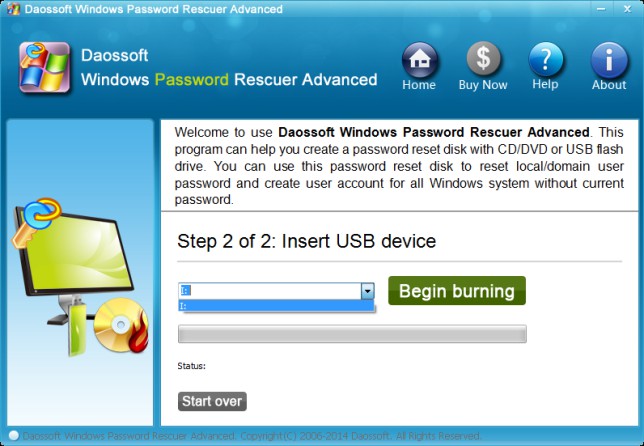
-> Start up the password reset USB maker on another accessible computer and insert a disk drive, like a CD, DVD, or thumbdrive.

-> On the main interface, select an option, either CD/DVD or USB Device.

-> Once you see the disk drive listbox, select the USB drive you inserted from it and then click on Begin Burning.

 ::What can this password reset USB do for you?

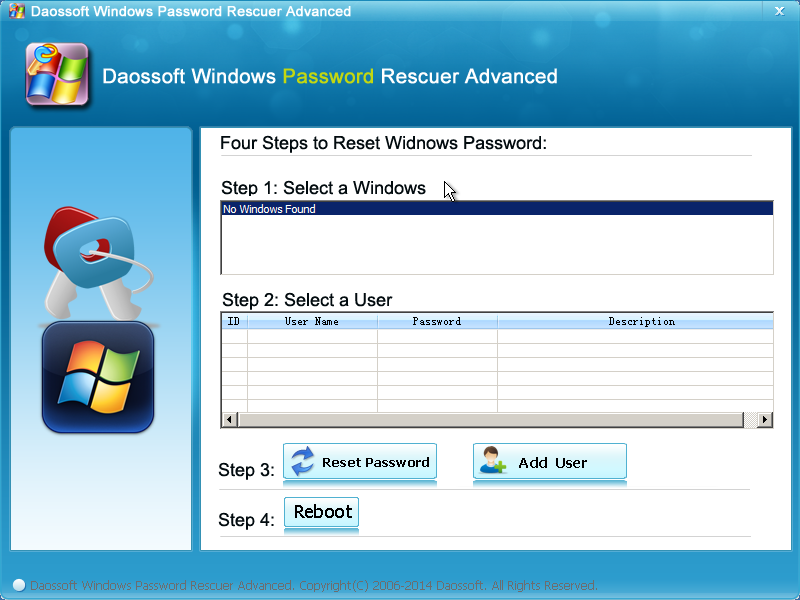
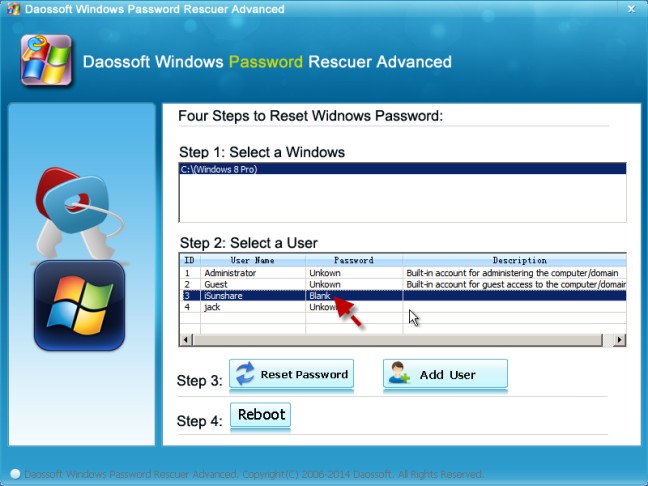
This password reset USB can reset passwords on all Windows 8 computers, whether yours or others’.

It resets all sorts of login password, including standard user password and administrator password for both domain account and local account.

Related Posts:

Get Password Reset Disk of Windows 7 for Another Computer

As is well known to us, a password reset disk will work for his owner only, or rather, for some computer of his owner’s. Is there any Windows 7 password reset disk for another computer (not yours? The answer is certainly. Here is how to create a password reset disk windows 7 for another computer.

::To get a password reset disk for all Windows 7 computers, follow the steps below:

-> Google Daossoft Windows 7 Password Rescuer and get it downloaded and installed.

http://www.daossoft.com/downloads/daossoft-windows-7-password-rescuer.exe

-> Fire up the Windows 7 Password Reset utility.

-> Insert a USB drive or CD/DVD.

-> Click on USB device or CD/DVD.

-> Select the targeted disk drive and click Begin.

It will only takes seconds to complete creating the password reset disk for another computer.

 ::How to use the password reset disk for another computer?

-> Connect or put inside the disk to another computer.

-> Boot up the computer from the password reset disk drive. (Have no idea? Refer to :

How to Set the AMI BIOS to Boot from USB Flash Drive

-> Once into the friendly user interface, select the Windows 7 OS and the User account that you log on to Windows Seven as.

-> Click the Reset Password icon on the bottom.

Congrats! You have reset the password for another computer resoundingly.

 Warning: Do perform password reset on another computer only after you get the permission of its owner.

Related Posts:

Retrieving Deleted Files from Recycle Bin After Emptying

Here is how to retrieve deleted files from Recycle Bin after emptying. Read on and get more details. Please keep in mind: Stop writing any more data to the targeted partition at once after you deleted the files. Otherwise, it might reduce the possibility to get them back fully.

Once you realize that you deleted some important files or folders by chance, download and install Daossoft Data Restore right away. And  follow these steps to get back your deleted files from Recycle Bin even after emptying:

-> Open Daossoft Data Restore Tool.

-> Select Deleted Recovery on the  shown up operating interface.

-> Select the drive or partition where the deleted files were ever located.

-> Click on Scan.

-> Next,   expand the folders in the right pane to find the files you want to retrieve.

-> Check the files you want to get and then click on Recover.

-> Select where to store the files (Warning: Don’t save them on the troubling drive-the drive that you are performing data recovery on.)

It will only take  a couple of minutes to retrieve the data, no matter what type of files you deleted or emptied. Besides, it is friendly enough for you to use. In the end, don’t forget to let me know your problems in using Data Restore Software. Why not try it now, for your valuable data?

 Video Might Help you:

Windows 8.1 Not Available in Store-How to Do?

This post wants to help you out when you would like to update to Windows 8.1 via Windows store but failed. It’s said that some people could not find Windows 8.1 update in Windows Store- Windows 8.1 are not available in Store.

But why do this happen? This is because you PC has not installed the “KB2871839” update and consequently you have trouble getting the Windows 8.1 update notification through App Store.

To solve the problem, press Windows logo key and C key together on the keyboard or swipe inside from the right screen edge -> Settings -> Change PC settings -> Windows Updates -> tap or click on Install. (see screenshot below)

windows update install

Once you complete the steps above, open Windows Store and try again. Generally, you will see the Windows 8.1 update notification once the APP Store is open.

If you could not download the update from Windows updates, you can download KB2871839 from Microsoft.com manually. To download KB2871839  by hand, click the link:

http://support.microsoft.com/kb/2871389

->Choose 32-bit version or 64-bit according to your current Windows. (see screenshot below)

download KB2871839 manually

 Related Posts:

Problems in Using Windows Password Rescuer

This post collects some common problems in using Windows Password Rescuer. If any more questions, please contact support center: support@daossoft.com Have a good time!

::Problem 1: “No Windows found” error prompt

Windows Password Rescuer (or Windows 7 Password Rescuer) only works on all versions of Windows. So, make sure that you are performing password reset on a Windows computer. If you use it on a Linux OS computer, you will certainly get the error for return. (see screenshot below)

no windows found

::Problem 2: Could not boot to the BIOS

There might be one or multiple reasons that result in it. To solve this problem, first of all, make sure that you have entered the BIOS setup utility, changed the settings to make the password reset disk (USB drive or CD/DVD disc) the first boot device and then pressed F10 on the keyboard to save the changes. Below are the details:

Press BIOS access key to enter the BIOS -> Boot tab (or similar items) -> use arrow keys and plus (+) or minus (-) key to change the boot sequence. Evidently, you need to make the password reset disk the first boot device. -> Press F10 key to save the settings.

::Problem 3: Error prompt: “This version only supports Windows 7 password resetting”

Such prompt appears because you did not use the right version to perform password reset. For instance, if you use Windows 7 Password Rescuer on a non-Windows 7 computer, you will get the warning. (see screenshot below) To solve this problem, make sure that you select the right Windows rescuer to download.

Windows 7 Password Rescuer download link: (supports all versions of Windows)

Windows Password Rescuer download link: (supports Windows 7 only)

only support 7

 ::Problem 4: Could not find your Windows password reset disk 

This situation occurs because the BIOS could not detect the device you inserted or connected. It means that there is something wrong with the disk itself. In this case, you can re-create a new reset drive and try again. Besides, you are really not recommended to use a memory card as USB drive because low-quality memory cards or card readers probably cause failing burning.

::What’s the default password our programs use?

In Windows XP, Vista, 7, 8, 8.1, our program use blank password (“”) as the default password. While in Windows Server 2003, Windows Server 2008 and Windows Server 2012, in order to meet the password security policy, we specify “Daossoft@2014” as the default administrator password. So, remember to change the admin password once you log back on to your Windows.  You are highly recommended to have a good password after picking.

Related Posts:


How to Turn off Password in Windows 8-Let Windows 8 Automatically Log On

In this post, we are assuming that you are fed up with typing a password every time on the logon screen and want to disable or turn off the password login feature so that you won’t waste time inputting a login password any longer. Luckily, this post shows you how to turn off password on Windows 8. Please read on for the detailed instructions.

  • Tips: You’re not recommended to perform this action on computers that storing important data or private information because others can access and change them without providing a password for verification if  password login becomes disabled. Just think twice.

::Steps to turn off password login on Windows 8:

In Windows 8, you can disable the password login very very easily. Just log in to Windows  8 as administrator first and then go to the Start screen or the Desktop (Want to boot your Windows 8 directly to the desktop? Read my How to Make Windows 8 or 8.1 Auto Login Direct to the Old-Style Desktop article.) -> Press Windows logo key and R key together to launch the Run box. -> Type “netplwiz”  or “rundll32 netplwiz.dll,UsersRunDll” (without quotes) and click OK button.

1. On the pop-up window and under Users tab, select the user whose password you want to turn off.

2. Clear the checkbox that says “users must enter a user name and password to use this PC.” under the “users and key” icon and then click OK. (see screenshot below)

select user

3. The Automatically Log On dialog box will pop up. And you have to type your current password and confirm it (Aha, it might be your last time to type the password.) so that the system will “remember” the password by itself later on. Once this action is complete, the system will remember and type the password for you and you won’t have to type it any longer-Windows will do it for you. (see screenshot below)

automatically sign in

 Related Posts:

How to Access Computer Registry on Windows 8

Here’s how to access computer registry on Windows 8. Read on and follow the steps below. 4 ways are available. And the first is the easiest.

How to access PC registry on Windows 8?

Method 1: Press Windows + Q -> type in “regedit” -> click or tap on the Regedit app.

Method 2: Press Windows logo key and R at the same time. -> type in “regedit“ and press Enter.

Method 3: Press Windows + X key combination->Choose Command Prompt (Admin) -> Input “regedit” and press Enter to execute. And then you will see the pop-up Registry Editor. (see screenshot below)

cmd

Method 4: Open Computer -> In the file searching box on the top right, input “regedit”. -> Double click Regedit from the results.

All the 4 ways above require administrative privileges. Otherwise, you won’t be successful. So, if you have no administrator rights, contact the administrator. But if you still failed, that might mean the registry is locked. You need to unlock it before you will be able to make and save any changes.

Here’s how to unlock the registry: Press Windows +R to pop up Run box -> type “gpedit.msc” and click OK (to open Local Group Policy Editor ) -> Under User configuration, double click Administrative templates and then System -> In the right pane, double click on Prevent access to registry editing tools -> choose Disable and then click OK. Next, continue with Method 1 in order  to try again. (see screenshot below)

lgpe    choose disable

Good luck! Hope this works for you!

Related Posts:

I Forgot my Tablet Password-How to Reset a Password on a Tablet

If you are using a Windows tablet (generally running Windows 8) and you forgot the administrator password by chance, please take it easy. Actually, you will be able to replace it with a new password with the aid of Daossoft Windows Password Rescuer.

Daossoft Windows Password Rescuer can help you reset administrator or user password of domain user or local user on all current Windows versions. It’s so powerful that you should make sure that you use this tool on your own computers only.

To reset a password on a tablet in 4 steps:

Step 1: Google Daossoft Windows Password Rescuer, find and download it. Or click this download link directly

Step 2: Install and run Windows Password Rescuer. Insert a USB flash drive to burn a password reset drive.

burn  password reset drive

Step 3: Boot your tablet from the password reset USB drive.

Press and hold Power button and Volume + button to access and change the BIOS settings. Once into the BIOS screen, select Startup and then Boot.  Your connected USB drive should be detected and displayed and you need to make it rank at the top of the list.  Press F10 to save and exit, choose yes and  then reboot.

Step 4: Select and reset the Windows user account whose password you forgot.

select and reset password you forgot

Restart your tablet and you will be able get back into your Windows 8 with the new password you reset.

Related Posts:

How to Use Homegroup on Windows 8

In this article, I am going to share something about how to use homegroup feature on Windows 8, such as how to create a homegroup in Windows 8, how to add another computer to the homegroup, etc. If you are pretty interesting, just read on!

::How it works?

Like you know, the homegroup feature allows you to share files or devices on a homegroup network. But how it works? In short, someone created a homegroup and he could invite other computers in the same LAN to join the homegroup so that he could easily share something with them. And the man he invited should show the password before becoming a member of the homegroup.

::How to create a homegroup in Windows 8?

Press Windows + W -> type in “homegroup” -> Click choose homegroup and sharing option -> Click on create a homegroup -> click Next -> choose the files or devices (like printers, scanners and so on) and click Next -> Take down the homegroup password. -> click on Finish.

create

  • Tips: This password works when you want to access files or devices located on another computer. All you have to do is to add your computer to the homegroup after typing the right password (Of course, the homegroup creator should share you with the password in advance.).

::How to join a homegroup on Windows 8?

Note: The computer where you created a homegroup and the computer that you want to add to the homegroup should locate in the same LAN. If not, they won’t be able to connect to each other.

On another computer that you want to add to the created homegroup:

1.  Click Windows logo + X keyboard shortcut (or Click the Start button on Windows 7, Vista, XP) -> click Control Panel.

2. Under network and internet, Click the Choose homegroup and sharing options link. ->Click Join now, and then follow the homegroup wizard to input the password.

  •  If you do not found any Join now button, first, check if your internet connection is available. Second, check if the homegroup that you want to join has been created.  Generally speaking, the system can automatically detect the homegroup(s) in the local area network (LAN) as long as the homegroup exists and the internet connection is available.

Related Posts:


How to Turn off Narrator on Windows 8

I am using a Windows 8 tablet (Acer W700). I am pretty annoyed by the narrator.  Every time I try to turn up the volume, the narrator comes out.  I just want to totally remove it from my computer.  Please advise. Thanks!

Have you met the same or similar situation as the brother above? If so, read on! This post shows how to turn off narrator on Windows and even remove it from the computer for ever.  You have 3 options to solve the narrator problem.

::How to turn off narrator on windows 8?

Press Windows + X hot keys and access Control Panel -> Ease of Access Center (icon view) -> Click or tap on Use the computer without a display under Explore all settings -> uncheck the checkbox that says “turn on narrator.” (see screenshot below)

use a computer   uncheck

::How to disable narrator shortcut?

In Windows 8, if you press Windows + Volume up, the narrator app will pop up by default. You can disable this keyboard shortcut by following the details below:

Press Windows + W -> type “narrator settings” (or “turn off narrator”) and press Enter on the keyboard -> Under “pressing Windows + Volume up will turn on” select Nothing or any other app except Narrator. (see screenshot below)

turn off narrator    nothing

::Can I remove narrator from my PC forever?

The answer to your question is yes. You can delete the narrator so that the narrator app won’t disturb you any longer. However, you are recommended to back it up before removing it. Maybe the copy will be of use one day.  According to my test, I found it has become harder to delete narrator file on Windows 8 than on Windows 7. To make it, you need to get full control of the narrator.exe file. Below is how:

Press Windows + X keyboard shortcut. -> choose Administrator: Command Prompt -> input and execute the commands below in turn.

takeown /f C:\Windows\System32\narrator.exe

cacls C:\Windows\System32\narrator /G jack:F

Note: “C:” is the drive where you installed your Windows 8 and “jack” is my user name. Take place of it with your own.

OK, you now will be able to delete the narrator.exe file. Just have a try by yourself. If any questions, please inform me via comments.

Related Posts: